External fault-tolerant storage
The following steps assume that an instance of MITIGATOR has already been installed. Otherwise, install it using one of the following methods first.
Before configuring a cluster, you must configure virtual network (VPN). It needs network connectivity between instances to work. Detailed information on setting up and necessary accesses are described by the link.
This deployment scheme implies the physical storage of databases common to all MITIGATOR instances on an external server. The performance and fault tolerance of all DBMS is ensured by the administrator of the external server for specific requirements.
For correct system operation all packet processors must have the same amount of system resources available.
All instances are deployed as workers.
If the cluster is assembled from MITIGATOR instances that previously worked independently, then conflicts may arise during the integration. Therefore, on all instances except the future leader, you must execute the command:
docker-compose down -v
Executing this command will delete countermeasure settings, event log, graphs, and other information stored in the databases of these instances. If you want to save the data, you must first make a backup copy.
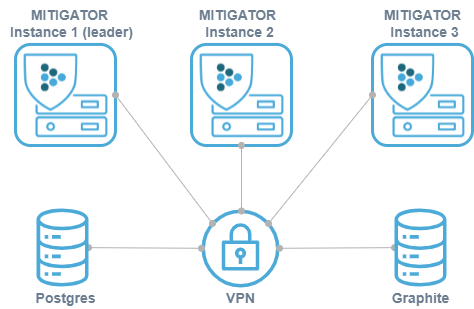
Interaction scheme:
- MITIGATOR connects to Postgres to write and read settings and logs;
- MITIGATOR sends metrics to graphite and refers to its API;
- ClickHouse is recommended as a Graphite backend.
Postgres setup
The SHMIG utility is used as a tool for scheme migration and further management.
Migrations must be taken directly from the container of the version you are using:
-
Deploy a fully functional stand (comment out
#COMPOSE_FILE=line temporarily in.envfile). -
Run the command:
docker-compose create postgres -
Copy migration scripts:
docker cp mitigator_postgres_1:/schema schema -
Run the command:
docker-compose rm -sf postgres -
Restore the state of the
.envfile by uncommenting the line#COMPOSE_FILE=.
At the Postgres level, you need to create a mitigator base. The migration scripts
will create a backend user and assign the necessary rights to it.
After that, at the DBMS level, you need to allow the connection for this user.
MITIGATOR instances connect to port 5432/tcp. The connection string can be explicitly overridden, the default is:
services:
  backend:
    environment:
      BACKEND_DATABASE_URI: "postgres://backend@${MITIGATOR_STORAGE_HOST}/mitigator?sslmode=disable"
Graphite setup
MITIGATOR sends metrics in the
Graphite plaintext
protocol format at: ${MITIGATOR_STORAGE_HOST}:2003 (TCP).
If you need to send them to several databases, the addresses can be specified explicitly separated by commas:
services:
  fwstats:
    environment:
      FWSTATS_GRAPHITE_ADDRESS: "${MITIGATOR_STORAGE_HOST}:2003,another-host:2003"
Mitigator accesses the Graphite API using the URL:
http://${MITIGATOR_STORAGE_HOST}:3080/render/.
ClickHouse setup
Only if ClickHouse is used as a Graphite backend.
-
Deploy a fully functional stand (comment out
#COMPOSE_FILE=line in the.envfile). -
Run the command:
docker-compose create clickhouse -
Run the commands:
docker cp mitigator_clickhouse_1:/etc/clickhouse-server/config.d clickhouse-config docker cp mitigator_clickhouse_1:/etc/clickhouse-server/users.d clickhouse-users docker cp mitigator_clickhouse_1:/docker-entrypoint-initdb.d clickhouse -
Run the command:
docker-compose rm -sf clickhouse -
Restore the state of the
.envfile by uncommenting the#COMPOSE_FILE=line. -
Set the variable
MITIGATOR_OWN_NAME=mitigator-1in the.envfile. Wheremitigator-1is an instance name. Should be unique for each instance. -
Set the variable
MITIGATOR_HOST_ADDRESS=192.0.2.1in the.envfile. Where192.0.2.1is a host address for this specific instance.
The resulting settings are recommended, but can be changed if necessary. F or example, see the section «Setting the retention time of metrics in Graphite».