Challenge-response authentication module for HTTP/HTTPS
Web Challenger (WebC) is a Docker container containing NGINX and an HTTP/HTTPS request processing module that works in tandem with the HCA countermeasure in MITIGATOR.
Possibilities
The HCA countermeasure redirects HTTP/HTTPS requests from unauthenticated IP addresses to WebC, where the sender is verified. If the verification is successful, the source IP address is added to the HCA’s authenticated table. HCA can also work with third-party L7 protection devices.
- Multiple packet processors can work with one WebC when working in a cluster.
- Multiple WebCs can work with one packet processor.
- WebC can add IP addresses to the HCA authenticated countermeasure table both via the dataplane network and via the mgmt network.
- The scenario of WebC working behind NAT is supported.
- Certificates and secret keys of protected domains can be loaded not to WebC, but to the load balancer behind MITIGATOR.
- The HCA countermeasure supports operation in the active synchronization mode.
- The ability to modify the NGINX configuration is supported.
- The ability to select the challenge mode for each protected resource is provided.
- Load balancing and fault tolerance enhancement capabilities are provided.
Active sync
When active synchronization is configured, the HCA forward and reverse broadcast session table data is synchronized between packet handlers. This allows multiple packet processors to work with a single WebC, for example when traffic to and from the WebC passes through different MITIGATOR instances.

Changing NGINX Configuration
The ability to modify the configuration of NGINX running on WebC is supported. This allows to extend the functionality of WebC using standard nginx tools, for example, for the purpose of sending logs from WebC or for transmitting the original IP address of the client when working through balancers and proxies.
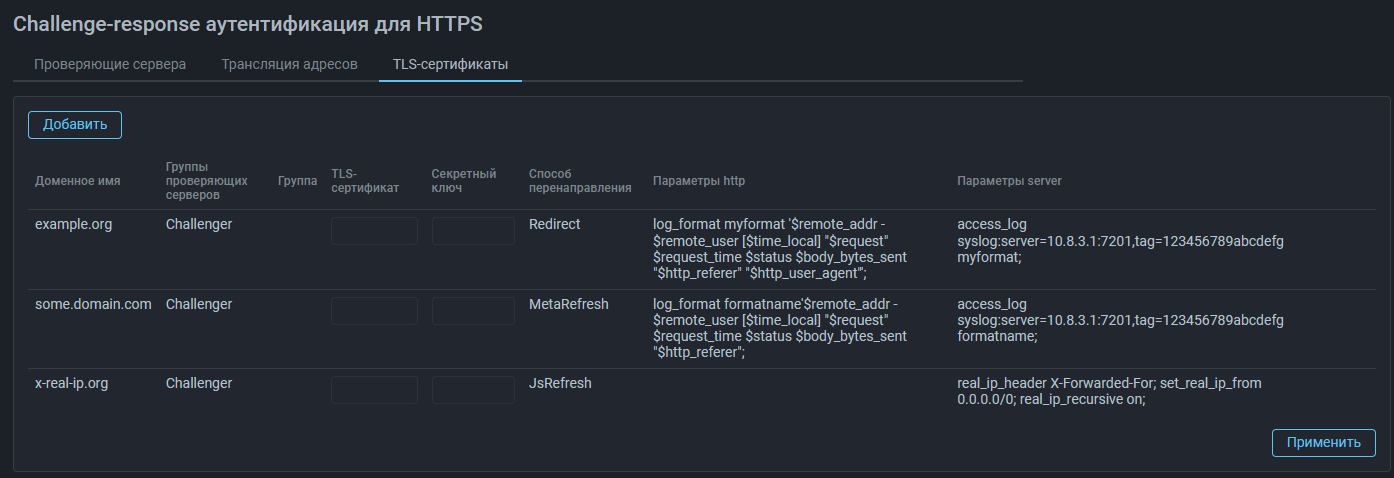
The information specified in the http field applies to all protected domains.
The information specified in the server field applies only to the specific domain.
Application examples:
- To send logs from Web challenger, fort example to Logan.
If you set the log format
log_format myformat '$remote_addr - $remote_user [$time_local] "$request" $request_time $status $body_bytes_sent "$http_referer" "$http_user_agent"';and sending parameters,
access_log syslog:server=10.8.3.1:7201,tag=123456789abcdefg myformat;then Web-challenger will send logs in myformat format to 10.8.3.1:7201
with token 123456789abcdefg.
- Transferring the original client IP address when working through balancers and proxies
The server field specifies settings for the ngx_http_realip_module.
real_ip_header X-Forwarded-For;
set_real_ip_from 192.168.1.0/24;
real_ip_recursive on;
In this case, if a request is received from the 192.168.1.0/24 subnet,
then Web-challenger authenticates not the IP address that was specified
in src_ip, but the one specified in the X-Forwarded-For http header.
Selecting a challenge mode for each protected resource
On the TLS Certificates tab, you can specify which verification mode should be used for a specific protected domain.
Challenge modes:
- Redirect;
- MetaRefresh (redirection is performed by the browser using the html tag
meta http-equiv="Refresh"); - JsRefresh (redirection is performed by the browser using the javascript code).
Fault tolerance and balancing
MITIGATOR allows redirecting traffic of different protection policies to different WebCs, both for the purpose of separating protected domains and loading certificates only to the necessary WebCs, and for the purpose of load balancing when protecting one domain in several protection policies. To do this, in the HCA countermeasure of different policies, you need to select different challenger groups.
MITIGATOR can periodically poll WebC to check mgmt availability. In case of failure, the countermeasure HCA will not forward traffic to WebC that did not respond to the poll. In a scenario with multiple WebCs, this allows for increased fault tolerance.
Traffic balancing can also be performed by means of a third-party balancer located behind MITIGATOR.
Using HCA with 3rd party L7 protection
The HCA countermeasure can work not only with WebC, but also with third-party L7 protection devices. In this case, the HCA performs the function of redirecting traffic to L7 protection. This functionality does not require loading TLS certificates or specifying protected domain names, but it is important to follow the same requirements as for WebC.

Working in authentication mode
When operating in authentication mode, the HCA countermeasure redirects traffic from unauthenticated clients to the L7 protection device. The L7 protection device performs checks and adds the IP addresses of verified senders to the HCA countermeasure’s authenticated IP address table via the REST API. Traffic from authenticated senders is then passed by the HCA countermeasure to the protected server without processing.
It should be noted that due to the redirection performed by the HCA countermeasure, the first session from an unauthenticated IP address is established by the client not with the protected server, but with the L7 protection device.
Working in reverse-proxy mode
Traffic from all users is always forwarded by the HCA countermeasure to the L7 protection device. The L7 protection device performs checks and adds the IP addresses of senders that fail the check to the TBL countermeasure block list via the REST API.
Implementation requirements

- It is recommended to place WebC on a separate physical server or virtual machine from MITIGATOR.
- MITIGATOR sends requests to WebC to the internal network. The network must deliver them to their destination.
- For WebC to work, traffic from WebC must be sent to MITIGATOR’s internal network interfaces.
- Groups are specified in the system settings that describe which WebCs work with which packet processors. This allows to select one of the pre-configured groups when configuring the HCA countermeasure.
- A group must contain all cluster packet processors.
- There may be several groups, and a different combination of WebCs for the same processors.
- Only one group is selected in the HCA countermeasure.
- If WebC and the MITIGATOR internal network interface are in the same L2 network segment, then WebC must have a route through MITIGATOR, and MITIGATOR must have the MAC address of the WebC network interface.
- If WebC is connected to router R2, then R2 must have a route along which traffic from WebC must be delivered to IPm int.
- MITIGATOR can work with WebC while in the “L2 transparent” and “L3 router” network integration modes.
- WebC is configured using MITIGATOR via VPN over mgmt network.
System requirements
- CPU: x86_64, 4 cores, SSE 4.2.
- RAM: 32+ Gb.
- SSD: 250 Gb.
- LAN: 1+ Gb/sec.
- OS: Debian 10+, Ubuntu 20.04+.
- MITIGATOR: v23.06.0 and higher.
CPU, RAM and LAN requirements are determined by the actual WebC load in RPS and can be estimated by NGINX performance.
Installation
It is assumed that Docker, docker-compose and wireguard-dkms are already installed on the server.
-
On the server, create a working directory for WebC:
mkdir -p /opt/web-challenger cd /opt/web-challenger -
Create a
.envfile with the following content:COMPOSE_FILE=docker-compose.yml # MITIGATOR version VERSION=vXX.XX WEB_CHALLENGER_VPN_ADDRESS=X.X.X.XHere
vXX.XXis the MITIGATOR version (e.g. v23.06 or v23.06.1). -
Download
docker-compose.yml:wget https://docs.mitigator.ru/v25.02/dist/web-challenger/docker-compose.yml \ -O /opt/web-challenger/docker-compose.yml -
Create a service to run WebC:
Download the service file:
wget https://docs.mitigator.ru/v25.02/dist/docker-compose@.service \
    -O /etc/systemd/system/docker-compose@.service
Activate the service:
systemctl enable docker-compose@web-challenger -
Download the WebC container:
-
Log in to docker.mitigator.ru
docker login docker.mitigator.ru -
Download images:
docker-compose pull
-
Setting up interaction with MITIGATOR via VPN
In order for MITIGATOR to interact with WebC, a VPN
must be configured.
The procedure is similar to the procedure for setting up a VPN between
MITIGATOR instances, with adjustments to the names of the working directory
and variables.
All files are created in the /opt/web-challenger directory.
If VPN communication between MITIGATOR instances is already configured,
the vpn-public.conf file should be taken from any of the configured
instances to supplement it.
-
Create a private key (example result:
yDPg5doavYH7fdD86nt+cOzSBL4znVZcrcrJwjY/Xmw=):wg genkey -
Write the key to
vpn-private.conf:[Interface] ListenPort = 4567 PrivateKey = yDPg5doavYH7fdD86nt+cOzSBL4znVZcrcrJwjY/Xmw=The specified port 4567 must be open for UDP traffic.
-
Get public key from private key (example result:
acfzxE6ZsiYE4jIqsBicOt7oT8ZuKhxBvuz0+6JxiEc=):echo 'yDPg5doavYH7fdD86nt+cOzSBL4znVZcrcrJwjY/Xmw=' | wg pubkey -
Add a section with the public key and WebC addresses to
vpn-public.conf:InfoIt is recommended to select an address for WebC inside the VPN that is separated from the instance addresses, for example
10.8.3.254. In this case, all addresses must be within the same /24 network.[Peer] PublicKey = acfzxE6ZsiYE4jIqsBicOt7oT8ZuKhxBvuz0+6JxiEc= AllowedIPs = 10.8.3.254/32 Endpoint = 192.0.2.1:456710.8.3.254— WebC address inside VPN. Must be unique among all VPN participants.192.0.2.1:4567— WebC external address and the port configured above. This is the address and port to which other instances will send UDP packets. -
Edit the
.envinstance address inside the VPN:WEB_CHALLENGER_VPN_ADDRESS=10.8.3.254It must match the one configured in
vpn-public.conf.
Configuring a cluster after adding an instance
After adding a new instance to the vpn-public.conf file, you need to make
the changes on all VPN participants.
On each of them you need to update the VPN configuration without restarting:
docker-compose exec gateway reconfigureStart
-
On the server, go to the working directory:
cd /opt/web-challenger -
Start WebC:
docker-compose up -d -
Check the connectivity between WebC and MITIGATOR instances:
-
Execute the command:
docker-compose exec gateway wg -
Make sure that there is a handshake between all participants in the VPN network.
-
Setting up in the Web interface
WebC configuration is performed via the MITIGATOR Web interface. The management interface is specified as the WebC VPN address and port 8081.

In terms of the MITIGATOR system, WebC is a challenge server. Challenge server groups are created and configured only by the system administrator. After specifying the challenge server settings, the administrator must specify the protected domain names on the “TLS Certificates” tab and select a group of challenge servers, on which the traffic of each domain will be verified. For each domain name, a TLS certificate and a secret key must be loaded.

A more detailed description of setting up a challenge server is provided in the built-in MITIGATOR documentation.
Once a group of challenge servers has been configured and associated with a protected domain name, it can be selected from the list in the HCA countermeasure settings.
